Apr 16, 2014

Mattepaint camera setup for multiple shots

Hi, so it lasted for a little while I managed to really post a new one! :) Sorry for that!
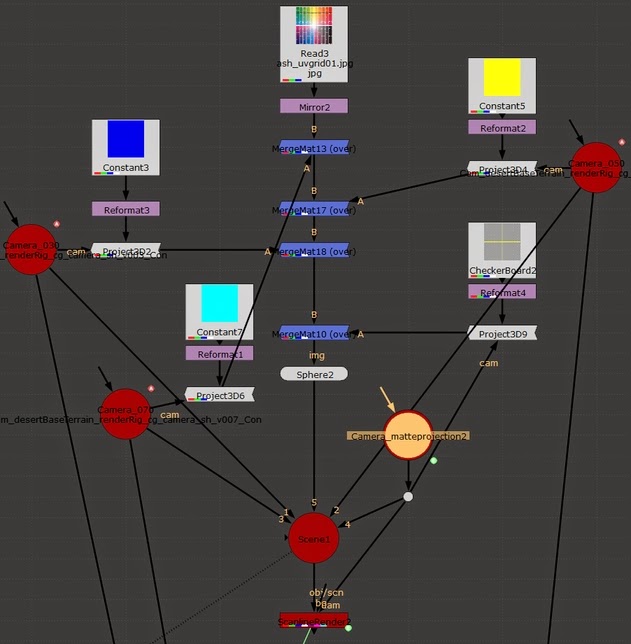
So in our current project we have a few sequences where we are using background mattepaints. Nothing new at this point. But I really like the way I create the camera and the framing for the mattepaint, from the existing shot cameras. The concept is that we should give the painter the least possible work :) (Not because he is slow) The less number of paintings and less area to paint, is the better. So I exported the cameras from maya to nuke, all animated of course. I make an environment sphere, using an uv grid as a texture, just to see where are the cameras heading. I really like the camera projection in nuke, because I can project from every shotcamera a constant color onto this sphere, using mergemat node, and then scrubbing in the timeline I can see all cameras animating the projection in realtime. Then I use a checkerboard texture projection (see the second and third image below) for a newly created mattecamera. The purpose it should cover all the area covered by the other cameras (those are projecting different constant color). I usually duplicate one of the shotcameras (usually the one with the biggest field of view) that will be the new mattecamera. Then I lower the focal length, to make the fov bigger, and rotate as needed. If there are cameras facing completely different directions, then more than one mattepaint is needed, and we should group the cameras based on facing direction. These cameras I pass back to maya, and render a basic lit environment, that the painter uses as base for his mattepaint. When the paint is ready, I save layers as images from that, and project back onto proxy geometries of the original scene geometry. Or just onto cards, if further away. Using of course the same mattepaint camera as projector camera.


Node setup, the main thing is the projection using mergemat nodes to the sphere.


Projection in 3d view


Nov 12, 2013

New post!

Hi, at last we finished (or finishing just now) our big big project of the year: we created more than 10 minutes of full cg animation for Ubisoft's upcoming big car game called Crew. Unfortunately the videos are not public yet of course, until the game is released next year, but I can tell I'm proud of these videos, turned out quite fine (or most of them :)! Hope you will enjoy by the time the game released.
So this project was very heavy work, and I couldn't really concentrate on this blog. But now I will publish some useful experience of this work. Come back soon!

Apr 15, 2013

Adding source timecode to quicktime

So I've been searching for a solution for a current problem in our pipeline: I would like to embed source timecode in a quicktime movie, that is generated from image sequence, with either ffmpeg or ffmbc or similar. The timecode should be of course the sequence frame number. The problem is the sequences are not starting from frame 1, as we (at comp) and also the editorial uses the 3d dept. frame numbers (we are mostly doing full cg animation) As far as I did research ffmpeg can't write timecode got from the filesequence, on the other side ffmbc is capable of doing this, but can't start sequences from other than 1-4 frames (which I absolutely can't understand why it can't use ffmpeg -start_frame flag).
I would be glad if it could be solved with an open source software, but currently it looks that I have to use nuke for this also. Tried RV, but didn't work. Found out, that nuke has an addTimeCode node, that writes timecode information into metadata and fortunately writenode is able to embed it in the generated quicktime.

So what are the knobs in AddTimeCode node:
Start code: is a global starting position for cases where needs to be for example 01:00:00:00
Fps and get fps from metadata: if there is no fps metadata in upstream, uncheck the get fps from metadata checkbox, and set it manually, otherwise the output will be 24 frame per second.
Start frame: acts as a timecode offset.
For creating quicktime with proper timecode from image sequences (that are not starting from frame 1, I had to set the following settings:

start code: 00:00:00:01
fps: 30, get fps from metadata: unchecked
start frame: 1, use start frame: checked
This way for example if the source filesequence starts at frame 36, the timecode of the first frame will be 00:00:01:06

Very important that in write node there is a write time code checkbox, that must be checked. So this way when opening the mov in quicktime player, click at timecode numbers, and from the pop-up list choose Timecode:Non-Drop-Frame

Feb 25, 2013

solidarity

Hi, by taking solidarity with vfx artists all around, for seeing their position and needs (somewhat reminding to my job also), for seeing bad treatment of vfx houses by big studios, I changed the logo on my blog, to show my respect for them.
For someone not familiar with the events yesterday and before, read here:
fxguide about the demonstration
Open letter to Ang Lee
Rhythm and Hues chapter 11

Dec 14, 2012

Nuke tcl tips

I have a lot of tcl expressions, and other nuke snippets written down, because always forget these. I decided to share some. In general I can say tcl in nuke is very flexible and quick for simple tasks.
For expression testing the expression I use the text node, easier than always getting into the specific knob, and click edit expression.
So first come the tcls in knob expressions, with examples:

Getting a knob's value of a specific node:
[value Read1.first]

Getting a knob's value of current node:
[value this.size]

Setting a knob's value of a specific node:
[knob Read1.first 10]

First frame of current read/write:
[value this.first_frame]

Setting a general tcl variable :
[set variablename value]
for example (tsize is the variable name):
[set tsize 15]

Using that variable later (notice the "$") for setting a knob value:
[knob this.size $tsize]

Name of the input node:
[value this.input.name]

Expressions in a group going outside (to parentgroup or root). This example gives the name of the node before the group:
[value this.parent.input.name]


String substitute and compare:

Replace string in current node file knob with regex (string "proj" to "projects" in all occurences):
[regsub -all "proj" [value [node this].file] "projects"]

String map (replace multiple stringpairs):
[string map {"aa" "xx" "bb" "yy"} "aaffffaabb" ] this returns: xxffffxxyy

Compare values:
[string equal [value Text1.message] "bla"]

Regexp matching:
[regexp -inline "_v\[0-9]{3}" [value Read2.file]]


Path manipulations:

Filepath without extension:
[file rootname [value [topnode].file]]


Filename only:
[basename [value [topnode].file ]]


Filename only without extension:
[basename[file rootname [value [topnode].file]]]


This one splits the uppermost node's (probably a readnode) filepath by slashes and then joins together until a certain point, giving a directory few levels upper than the currrent path). "File split" does the splitting, making a list of directory names, "lrange ... 0 7 "selects a range from the list, from the beginning to the 7. item, and "join ... / " joins by forward slashes (which I use always in paths):

[join [lrange [file split [value [topnode].file]] 0 7] /]


This one can be used in a writenode fileknob to quickly convert the topmost readnode's path to another format(tga). Similar to the previous, but splits path by "." (different than previous file split), and gets the range from the beginning to 2 before the end, this way cutting off the extension and the counter (framecounter must have preceeded by a "." ) :

[join [lrange [split [value [topnode].file] .] 0 end-2] .].%04d.tga
(I use similar to make the comps writenode have the output path automatically getting from path of the nukescene )

Other useful:

Get the value the channel of a node, at a specific pixelcoordinates (e.g.: 10,10):
[sample [node input] red 10 10]

Setting a variable, without returning that (useful in a textnode):
[set seq [value Read1.file]; return]


Example of "IF" in an expression:
[if {condition} {expr1} else {expr2}]
for example:
[if {[value Switch1.which]==1} {return "aaa"} {return "bbb"}]

to be continued...


Sep 6, 2012

Applauncher - setting environment for apps

Hi, sorry for not posting for a long time. But this one is really interesting! Earlier this year we had a job to recreate a character that we used in Eset commercial. It would have been an easy thing, because we had the asset, but the arnold renderer, and shaders are changed a lot since last summer. And the config wasn't backed up properly with the project. This gave the idea that we should re-think our current application-environment-management system (what an expresssion:)
Until that point, for maya we had a lot of scripts, icons, shelves on the fileserver, that accessible for every maya; and with plugins/modules on the local machine (if it would be also on fileserver, the plugins we develop can't be updated if someone is using maya loaded that plugin.) For starting maya, artists were using a custom batchfile that copies needed plugins to local, sets some environment variables, and launches. But almost everything was hard-coded to maya.env and the batchfile.
It worked to point, but wasn't effective nor elegant. So we came up with the idea of Applauncher.
Here I give a little insight about this software, maybe useful for some of you thinking about similar solution.
It is a gui for starting maya, and nuke with the proper environment. In short: in the gui the artist chooses the project (show) and the context (lighting, dynamics, animation etc.) he/she wants to work. Then applauncher copies the needed scripts, plugins, modules etc., sets the environments and launches the application.
What is needed for the given context is stored on the network in an xml file, that is easy to edit and read. It's created by sup. before the show starts, but of course can be modified later. In the xml we define what addontype (scipts, modules etc), what addon with what version is in that environment config.
So when user chose context, and clicked on launch, the needed content (plugins, scripts etc) are copied to local disk, or if that content is already there, the copy process can be skipped. After copy, depending on addontypes the proper environment variables are set.
For maya we use following addontypes: modules, scripts, shelves, icons, additional envvars. All plugins are stored in modules: that is the most flexible type of addon.
For nuke we use much more type of addons, that are differently set for the software: gizmos, scripts, plugins, icons, luts, modules, ofx, prefs etc.
Important that on the server-side the addons are versioned, but on local they are not. Always the actual version of the addon (defined in xml) is copied.
We don't make separate addon for each gizmo, or script, it would be hard to version and manage them. Rather we chose to group them along some common attribute. For example my script package for maya is 1 addon. The other developer's scripts are another addon.

Example structure in xml, for maya:

addonGroup: modules
addon:commonscriptpack
version: 1.0
addon: userscriptpack1
version: 1.1
addon: userscriptpack2
version: 1.5
addon: yeti
version: 1.0
addonGroup: shelves
addon: lighting
version: 1.3
...
Now every artist at us uses this little gui without problems. The advantages: 1. we can restore any working environment at any time 2. much faster app. loads. 3. easier distribution of tools. I even integrated it with deadline, it was a must to run renders with same environment as the artists.
I hope this writing was understandable, and useful. If needed, I can continue telling more about this, because I think it has really nice logic, and features, that now is proven to be very useful.
Further reading on this theme in these topics: 1 2 3


Jun 14, 2012

Submit nuke render job with specific views for deadline

Hi, I posted this on deadline forums, I thought it would be on a good place here too.
In this post I describe what files to edit in the deadline repository, if you want to submit not all, but specific view(s) from a multiview (stereo) nuke scene to deadline. The modification include the nuke submitter dialog, where user can check which views to render, and the nuke plugin file. Hope it helps someone. By the way it is for deadline 5.0, the exact solution for other versions may be different.


Submission/SubmitNukeToDeadline.py, gui declaration in __init__ somewhere append this:

1:   self.viewToRenderLabel = nuke.Text_Knob( "separator31", "Views to render:" )   
2:   self.addKnob( self.viewToRenderLabel)   
3:   self.views = nuke.views()   
4:   self.viewToRenderKnobs = []   
5:   for x, v in enumerate(self.views):   
6:    bknob = nuke.Boolean_Knob(('viewToRender_%d' % x), v)   
7:    bknob.setFlag(0x1000)   
8:    self.viewToRenderKnobs.append((bknob, v))   
9:    self.addKnob(bknob)   
10:   bknob.setValue(True)   


Still SubmitNukeToDeadline.py, in SubmitJob function, where writing into plugin info file, for example after: "fileHandle.write( "NukeX=%s\n" % dialog.useNukeX.value() )"


1:  viewsToRender = getSelectedViews()  
2:  viewsToRender_str = ','.join(viewsToRender)  
3:  print 'Views to render in plugin info file: %s' % viewsToRender_str  
4:  fileHandle.write( "viewsToRender=%s\n" % viewsToRender_str )  


Still SubmitNukeToDeadline.py, at the end, a new function to get list of views from submitter dialog (that the user selected) write this:

1:  def getSelectedViews():  
2:   global dialog  
3:   x = 0  
4:   viewsToRender = []  
5:   for vk in dialog.viewToRenderKnobs:  
6:    if vk[0].value():  
7:     viewsToRender.append(vk[1])     
8:   x+=1  
9:   print '\nViews to render: %s\n\n\n ' % viewsToRender  
10:  return viewsToRender  


-------
In plugins/ nuke.py file in RenderArgument function, just before return append this:


1:  viewsToRender = GetPluginInfoEntryWithDefault( "viewsToRender", "" )  
2:  if viewsToRender != '':  
3:   LogInfo( "==VIEWS==\nUsing " + viewsToRender + " view(s) for rendering\n" )  
4:   renderarguments += " -view \"" + viewsToRender + "\""   

And that's it. It's even logging the views to be rendered.
Cheers,
Gabor