May 28, 2020
Jan 31, 2020
Happy new year and happy new decade everybody! As you may have noticed the blog is not updated very often. :) To make updates more often and to have some "inspiration", I included a donate button on the right side menu, so if you find some interesting and maybe useful information here, please consider a small donation (3, 5, or 10 euroes at the link)
Meanwhile I updated the page design a bit, also my cv, and also removed the more than a decade old showreel :) (which was commented as "will be updated soon" :D)
By the way, new content is being cooked, visit back soon!
Gabor
Meanwhile I updated the page design a bit, also my cv, and also removed the more than a decade old showreel :) (which was commented as "will be updated soon" :D)
By the way, new content is being cooked, visit back soon!
Gabor
Apr 24, 2018
Nuke scnenemanager and other tools
Hi,
I will present a quick description of our most important inhouse tool for nuke, that I developed :). Maybe some of you will get inspiration to develop something like this. :) It is a gui programmed in python, using pyqt and pyqt designer.
It has two parts, the first part we call "scenemanager", which is a helper gui for quick opening and saving nuke scenes (yes, we call it scenes, instead of scripts, to avoid confusion with python and tcl scripts. I know nuke scene itself actually a tcl script, but anyway :)
In this gui you can quickly select the different parts of the path to the scene, like project, shotgroup (sequence), shot, task, and scene. Basicly with 5-6 clicks you can open any scene from any project.
Very, very handy to avoid spending minutes for browsing the paths in the default nuke scriptopen browser.

It also has a number features, like: commenting scenes and displaying scene details, these are stored in an sqlite database. Storing used renderlayers for comparing later. Also featuring an elements checker, which is storing all the exr renders from fx or lighting, and comparing that to the versions used in the current comp, and displaying if there is new updated render for a shot. It is a brute-force method, it searches for exr sequences the selected project/shotgroup on disk. We could have used some automated method for storing render information from our deadline rendermanager, but we found that renders could come from outside, like outer renderfarm, or other vendors. So the most reliable method of knowing all the renders that we have, if we search for exrs in our file system.

The other part of this scenemanager we call "nuke butcher" :) (instead of nuke batcher), which is a standalone batch processor for nuke. It was developed in the need of more compers. With it you can chain different actions together, and do that on many comps at once. For example, the most basic use is to make a general herocomp for the first renders of one shot manually, and with this tool I can distribute that to all the other shots, and it will set the names, frameranges, and the newest arnold render versions automatically per shot, and submit all these comps to deadline to render. But it can do knob modifications on nodes, or any custom python code. Last time I wrote a custom code for that and with that I could export manually animated dof nodes from all the shots, then do a new hero comp render for all the shots (which means dof nodes are all the same in all shots), and then import the already exported dof nodes and place them back in comp. So it can save a loooooot of manual labor time.

Of course it was a big challange to develop it, and it still needs some update, like saving action presets, but it is still very functional, and working nicely, and it is the software that I'm the most proud of! At least until this point :)
Hope this was interesting for some of you and I would be very grateful if you could share also some tools or tips what you are using at your place.
Of course the software itself is not shareable, and not for sale, it is and inhouse development, used in Puppetworks.
Nov 17, 2017
Quick tip: create fog from deep render
Hi, I'm back on track :)
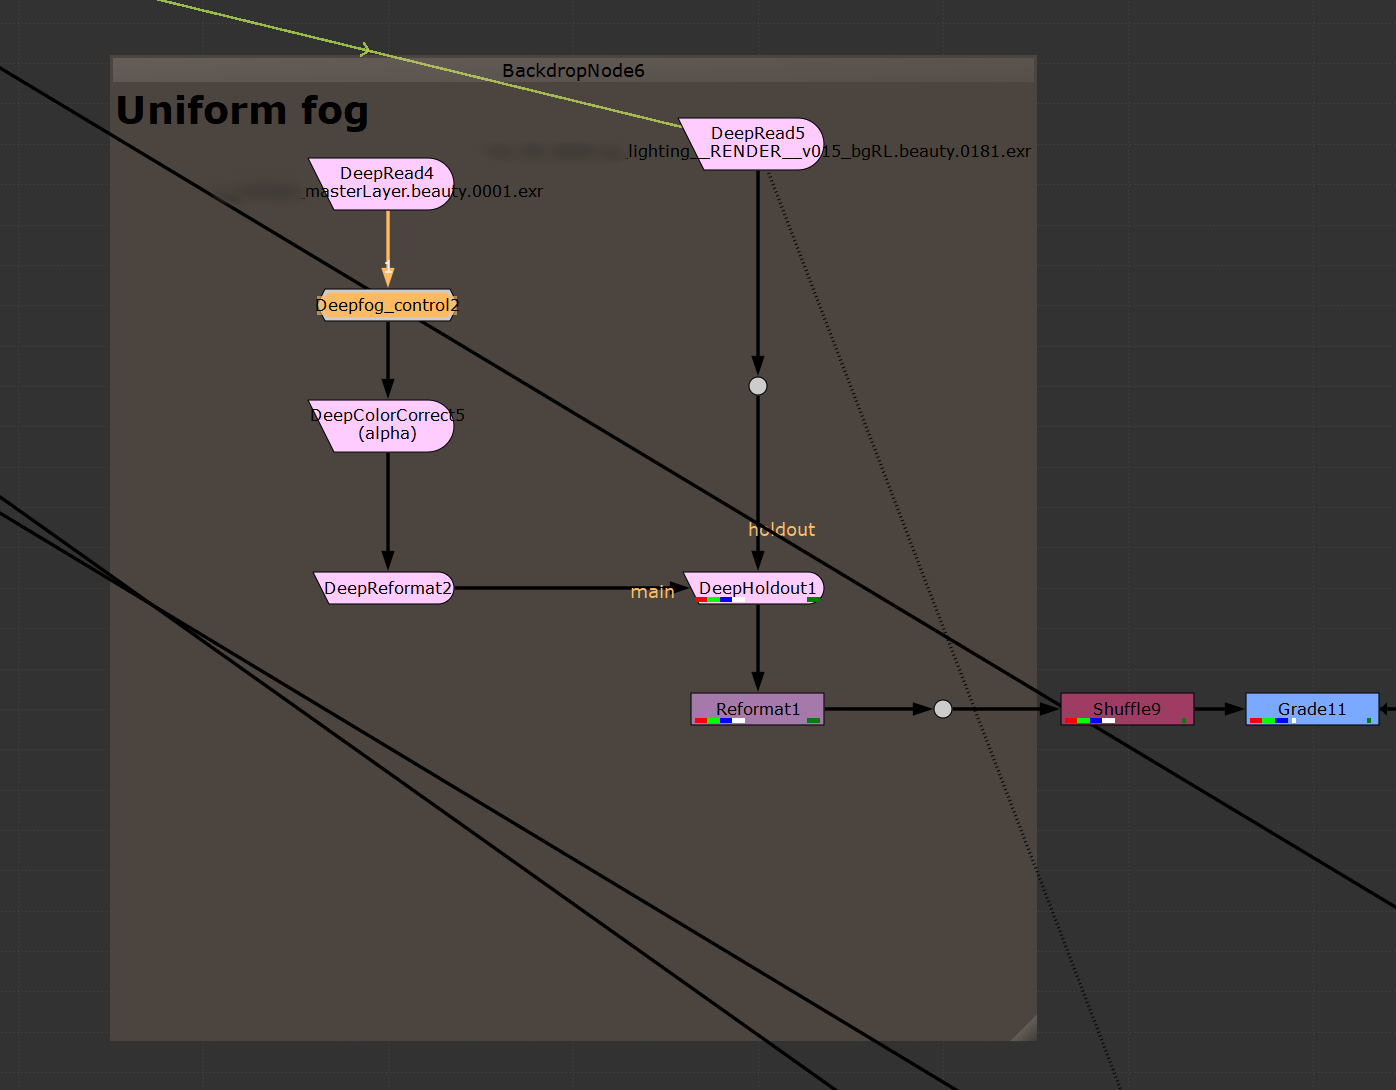
I always had problems with creating good fog from zdepth passes. Our 3d guys have the habit of rendering almost everything in one layer, so when I grade a zdepth pass and merge (over) it on top of the comp, often get some kind of a halo. The fog around objects in foreground, which are not covered, get wider thanks to grading the anti-aliased pixels. If I use an unfiltered depth pass, then I have jaggy edges. So it is always hacking with erode, blur and stuff, to make it more pleasing, probably you know that. But recently I discovered a quite good method. I use only 1 frame of a basic 3d fog (volume) rendered in deep. This frame I scale and transform and the make a holdout with the current shot deep render (yes, this is the only throwback, unfortunately we need that in deep), and that I use as a fog. I don't use any contrast modifier in order not to ruin the edges, just some coloring. Because the 3d fog doesn't have any noise in it, doesn't have to be rendered for each shot and every frame. 1 frame is enough. After this setup I can use some noise on cards to break it up (brightening/darkening with the noise as masks), in order not to look so uniform.
Of course I can use this for creating depth-based masks for color grading of the areas. Here you can see some images of this method, and if you are interested I can attach my deep fog sample, and my basic setup. Let me know in comments.
The control node has offset and multiply values, with that you can control the coverage of fog. Here you can see two different settings:
Adding some slight variation with noise:
I always had problems with creating good fog from zdepth passes. Our 3d guys have the habit of rendering almost everything in one layer, so when I grade a zdepth pass and merge (over) it on top of the comp, often get some kind of a halo. The fog around objects in foreground, which are not covered, get wider thanks to grading the anti-aliased pixels. If I use an unfiltered depth pass, then I have jaggy edges. So it is always hacking with erode, blur and stuff, to make it more pleasing, probably you know that. But recently I discovered a quite good method. I use only 1 frame of a basic 3d fog (volume) rendered in deep. This frame I scale and transform and the make a holdout with the current shot deep render (yes, this is the only throwback, unfortunately we need that in deep), and that I use as a fog. I don't use any contrast modifier in order not to ruin the edges, just some coloring. Because the 3d fog doesn't have any noise in it, doesn't have to be rendered for each shot and every frame. 1 frame is enough. After this setup I can use some noise on cards to break it up (brightening/darkening with the noise as masks), in order not to look so uniform.
Of course I can use this for creating depth-based masks for color grading of the areas. Here you can see some images of this method, and if you are interested I can attach my deep fog sample, and my basic setup. Let me know in comments.
 |
| Old graded Zdepth method (left) vs. deepfog method (right) with a character in front. Notice the hair |
 |
| Node setup |
The control node has offset and multiply values, with that you can control the coverage of fog. Here you can see two different settings:
 |
| Depth mask with different settings, offset and multiply. |
 |
| Detail with noise |
Oct 4, 2016
Nuke studio edit export to mrviewer
Hi, new post again, whoooa! Sorry for the delay! But we had a big-big project in the first half of the year: we had the honor to work on the new feature movie made for the Final Fantasy XV game, called "Kingsglaive". It was an extreme effort for our studio, to do the more than 13 minutes of photorealistic cg animation, from previz to compositing, but at the end we managed to complete 433 shots! I took part as lead compositor, and I can say we learned a lot on this show. Thanks to Square Enix for getting us on board, despite of that at the end we had our most rough and challenging weeks of all time, in terms of workload and the lack of sleep :)
So for this tip: we are using nuke studio for handling our editing work. That means usually from previz, every editorial job is done in this software. Without this, and its export system, would have been much much harder to deliver all the shots in all the requested formats for Square. The problem was that we have only a few licenses, and a lot of artist should be looking at the cut. Exporting the cut to quicktimes is not a perfect solution, because it's color, quality, can't zoom in, and it's not showing always the latest state of the work, just in the moment of exporting. So I searched and found a solution: mrviewer! Its brilliand piece of open source player, with a lot of options. (Sometimes it crashes, but which software doesn't? :)
Here is a code snippet, you can export the edit from nuke studio, to mrviewer. Its not handling dissolves or anything fancy, just putting the clips one after the other, with the provided in and out points. But usually that's what we need.
# MRPLAYER REEL GENERATOR:
from hiero.core import *
import os.path
import re
myProject = projects()[-1]
clipsBin = myProject.clipsBin()
selItems = hiero.selectedItems
try:
len_selitems = len(selItems)
except:
len_selitems = 1
print len_selitems
clipsPaths = []
if len_selitems > 1:
for item in hiero.selectedItems:
if type(item) == TrackItem:
print "\n-----------\n%s"% item.name()
filepath = item.source().mediaSource().firstpath()
ssin = item.source().sourceIn()
print 'Clip source (version) in: %s ' % str(ssin)
ssout = item.source().sourceOut()
print 'Clip source (version) out: %s ' % str(ssout)
usedSInRelative = item.sourceIn()
print 'Clip (shot) in: %s ' % str(usedSInRelative)
usedSOutRelative = item.sourceOut()
print 'Clip (shot) out: %s ' % str(usedSOutRelative)
usedSourceInResult = ssin + usedSInRelative
usedSourceOutResult = ssin + usedSOutRelative
print 'Clip source startTime: %s' % item.source().mediaSource().startTime()
clipsPaths.append([filepath, usedSourceInResult, usedSourceOutResult, ssin, ssout ])
path = 'c:/temp/XY_editorial_COMP.reel'
fileh = open(path, 'w')
fileh.write('Version 2.0\n')
for line in clipsPaths:
fileh.write('"%s" %s %s %s %s\n' % (line[0], int(line[1]), int(line[2]), line[3], line[4]))
fileh.write('EDL')
fileh.close()
#---------------------------------------
You will need this pythonscript installed for studio.
So the workflow is: in studio select the needed clips, prefereably cut one after the other in one track. Use the getpythonselection script, that store the clips in python objects.
Edit the output path to the desired path in the script at line which now says:path = 'c:/temp/XY_editorial_COMP.reel'
Keep the extension ".reel"
Run this script. It writes out the reel file to the provided path. In mrviewer you can now open this as an image. It will load the clip list, but in order to see the entire cut, you need to press the edl button in the "reels" dialog.
Hope this helps for you. If you have problems, or find a bug, or just used this script without any problems, let me know.
May 7, 2015
PositionPoisson
Hi, new post at last! Yippee!
Actually the credits of this nuke tip entirely goes to my colleague Zsolt Sebők, who had the idea, and did the research and experimentation with it, and kindly permitted me to present on this blog. Thanks Sebi!
So the as compositors in an animation house, we often find ourselves in a situation that we need to import geometry from 3d scene. For mattepaints, or for render error fixing etc. Sometimes they (3d guys) export it, but sometimes we have to open and export it ourselves, if want to get it in time. It's a painful and slow process, especially when the scene is big. Further problem when geometry is present in the lighting scene only as a standin, so we have to go further back in pipeline. I assume you know what I'm talking about.
The idea is, that we can generate fairly accurate geometry from positionpass and normalpass of the renders. As a primarily animation house we do mostly full cg animation, so we always have passes like world position and normal from arnold, and with that and a clever node positionToPoints, we can generate an accurate pointcloud. This is step one.
Nuke has this poisson mesh node, that can generate geometry from pointclouds. Probably it was designed to work with pointclouds from cameratracked scenes. But in our case we have the pointcloud from the passes, and is much more correct, than a pointcloud generated from matchmove can be. This is step two.
So the workflow is this: we make a pointcloud, that I'm sure everybody does with positiontopoints node, to clearly see the 3d scene, to help with inserting cards, tweaks etc. Then attach a poissonmesh node, and that's it. Be careful, there are several PositionToPoints node types. The one that has class (press i on the node) attribute PositionToPoints2, and loaded by PositionToPoints2.dll. We had an older version of that (PositionToPoints.dll), and that couldn't load the normal pass properly, and poissonmesh couldn't generate anything. Be careful to use unfiltered positionpass, otherwise you will get incorrect points at the edges.
We found the poissonmesh default settings are quite good, in terms of speed and quality. Maybe the size parameter would be better at 1. If you need more geo detail, increase depth a bit, but carefully, this makes much slower the process. The geo generated is much detailed where the pointcloud is present, the empty areas are approximated and rough. But usually good enough.
If not all parts of the scene needed, a good thing to stencil out the unneeded part from beauty, so nuke can handle much better (less geometry), and detail is not spent on stenciled parts.
After the geometry is generated, it can be used for mattepaints, projecting some image on that.
We have several ideas to improve this workflow, but that will be covered later. Hope you will find this tip useful!
Here are some example screenshots:
 | |
| Needed passes: beauty, unfiltered worldposition, normal |
 |
| Generated pointcloud |
 | ||
| Generated geometry on top of the pointcloud |
 |
| Filtered (wrong) positionpass, points with incorrect position all over |
 | |
| Cloud from side |
 | |
| With geometry |
 |
| Quite good fit of the geometry |
 |
| Center part of igloo is masked, faster operation |
Dec 4, 2014
Radio buttons in nuke
Hi, I always wanted to have the option of creating radiobuttons in the nuke gui, for gizmos. Its easier to use than dropdown menus, because they need only on click to select the value. Today I checked the documentation, and I found an option. The radiobuttons are a different widget version of the enumeration knob. You can't add this knob like others via the "manage user knobs" panel, but you can with the help of a little python. For example like this:
n = nuke.toNode('Group1')
n = nuke.toNode('Group1')
r = nuke.Radio_Knob('options', 'Option channels', ('red', 'green', 'blue', 'alpha'))
n.addKnob(r)
First argument is the name of the knob, second is the label, and the third is a tuple, with the radiobuttons' name in it.
Hope this was useful, cheers.
Subscribe to:
Posts (Atom)